

Building a Movie Reminder Application Using Twilio Verify and Twilio SMS


An individual gets excited about watching a movie after reading its summary from a poster, however, imagine when they find out the movie is yet to be released -- the emerging sadness as they slowly close the browser and forget about the movie. To help them remember to watch this movie when released, we can build a fun web application where they can subscribe to a yet-to-be-released movie and get an SMS message when the movie is released.
We would send the release messages via SMS using Twilio's Programmable SMS as it enables developers to send SMS messages using the SMS API. However, to reduce spamming, we need to ensure the mobile number belongs to the user subscribing to the movie. Twilio Verify enables verification of users via SMS, Phone call, or Email, and we can use this to implement the number verification.
While building this application, we would go through the following processes;
- Using an Express.js application to store and retrieve data in a Mongo Database .
- Set up a React.js web application where users subscribe to a movie by providing a - mobile number.
- Using Twilio verify to verify subscribers’ mobile number before saving them.
- Using Twilio SMS to send a movie release SMS to verified numbers using the Twilio SMS service.
Technical Requirements:
To follow along with this article you need to have:
- An understanding of JavaScript as this is a JavaScript written application.
- Node.js installed on your local machine.
- A free Twilio Account to use Twilio's Products . You would be credited with $15 free credit to use when you Create an acount.
- An understanding of React.js
User Flow:
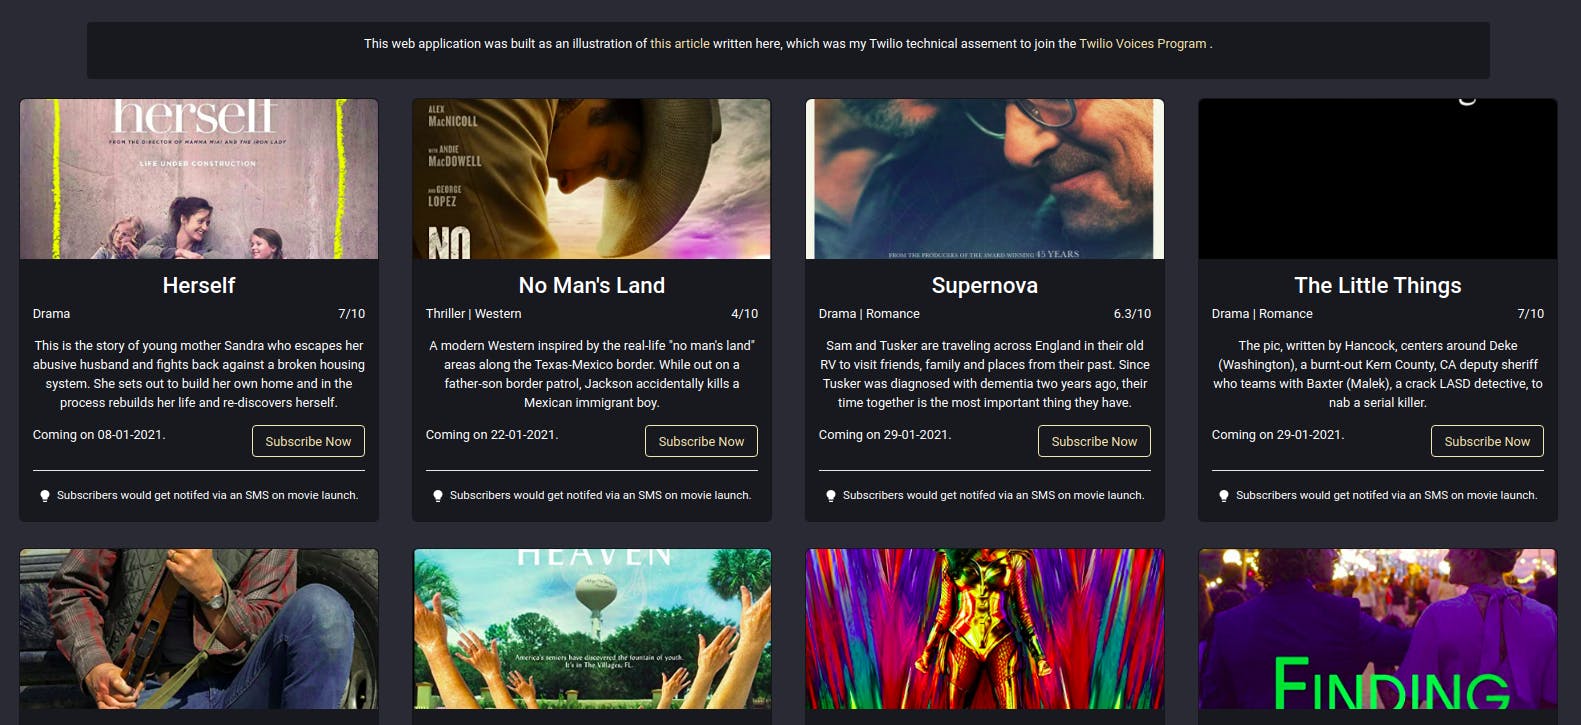
The web application is built to display a list of movies, most of which are yet to be released. We however provide the functionality for a user to subscribe to a yet to be released movie by providing their mobile number which we verify first and then add them as a release subscriber to get an SMS when the movie is released.
Getting Started:
We begin with the data layer -- an Express.js backend application where we use the Twilio Verify service to verify a number, then use Twilio SMS to send a release message to numbers stored in a connected Mongo Database.
We would go through the following steps:
- Setting Up An Express.js Application connected to a Mongo Database
- Creating a single route with the needed application endpoints
- Setting up a Twilio Verify and Twilio SMS services using the Twilio console .
- Using Twilio Verify and Twilio SMS within the created endpoints
Setting Up An Express.js Application
We would expand this pre-built express.js application which connects to a Mongo Database. To get started, clone the repository from Github to your local machine by running:
git clone https://github.com/vickywane/twillio-express-app.git
After cloning the project, move into the project directory and install the project dependencies using
cd twilio-express-app && yarn install
API Routes and Endpoints
We create three new dummy endpoints using an express router instance in the routes.js file.
// routes.js

require("dotenv").config();
import express from "express";

const app = express();

app.post("/verify-number", (req, res) => {});

app.post("/add-verified-subscriber", (req, res) => {});

app.post("/send-release-notification", (req, res) => {});

export default app;
We want to use each of these endpoints to perform some operations with Twilio. After setting up our application on Twilio using the Twilio console, we would come back to implement the functionality of the endpoints created above.
Next, We modify the server.js file to add the express router instance exported from the routes.js file to the Express.js application with a base route of api/routes.
// server.js
import express from "express";
import Routes from “./routes”

const app = express();

// PREVIOUS SERVER CODE

app.use(“/api/routes”, Routes)
Setting Up Twilio Verify To get started with Twilio Verify using the Twilio developer console, we create an account or sign in to an existing account and create a new project following the prompts for creating a project.
Note: Selecting Twilio Verify as a project service to be used when creating the project would make the console provide resources that would make it easier to get started with Twilio verify.
After the project has been created, we create a new service from the Learn & Build tab, following the three outline steps for creating a service to use Twilio Verify as shown below;
Completing the steps above, we make a test verification with a mobile number using the console, after which the service is successfully created and listed among the available services for the project within the Services tab.
We copy the Service ID for the newly created service shown in the Services tab into a .env file within our Express.js application.
//.env

SERVICE_ID=”xxxxxxxxxxxxxxxxxxxxxxxxxxxx”
Navigating to the main console dashboard by clicking the home icon in the sidebar, we can see an overview of our created project. Within the Project Info section on this page, we would find an ACCOUNT SID and AUTH TOKEN credentials.
We copy and add the two credentials found in the Project info section into the .env file in the Express.js application as they would be needed when connecting to Twilio.
//.env

ACCOUNT_SID=”ACXXXXXXXXXXXXXXXXXXXXXXXXXX”
AUTH_TOKEN=”E8XXXXXXXXXXXXXXXXXXXXXXXXXXX”
Setting Up Twilio SMS
We want to send an SMS notification informing a user when a subscribed movie has been released and is available for viewing. To do this, we would use Twilio SMS, a service from Twilio for sending programmable SMS to millions of users across several geographical regions.
From the All products and services section of the Twilio console, we select the Programmable Messaging, then the Messaging Services to create a new message service for our application, following the provided prompts for creating an SMS service.
If you don't already have a phone number with Twilio, the next step would be to purchase one using the available Twilio credits. ( $15 worth of free credits is allocated to every newly created project ) to be used as an SMS Sender for this created service. After purchase, the number would be linked when adding a sender.
After the message service has been created, it would be listed on the Messaging Services page, clicking it would open the Sender Pool page where we can find the list of senders available for this service. We would add the SID number shown from the first sender to our Backend application environment variables using the .env file.
// .env
 ACCOUNT_SID=”ACXXXXXXXXXXXXXXXXXXXXXXXXXX”
 AUTH_TOKEN=”E8XXXXXXXXXXXXXXXXXXXXXXXXXXX”
 SENDER_SID=”+12XXXXXXXXXXXXXXXXXXXXXXXXXXX”
At this point, our created Verify and SMS services have been fully setup using the Twilio console and are ready for use within the endpoints of our backend application.
Using Twilio within Created API Endpoints
Starting with the verify-number endpoint, we want to be able to generate and send a verification code to the mobile number provided in the request body using Twilio Verify.
app.post("/verify-number", (req, res) => {
const { mobileNumber, countryCode } = req.body;

 const accountSID = process.env.SID;
 const authToken = process.env.TOKEN;
 const SERVICEID = process.env.SERVICEID;
 const twillioClient = Twilio(accountSID, authToken);

 twillioClient.verify
   .services(SERVICEID)
   .verifications.create({
     to: `+${countryCode}${mobileNumber}`,
     channel: "sms",
   })
   .then((response) => res.status(200).send({ data: response }))
   .catch((e) => res.status(422).send({ error: e }));
});
Above we create a new Twilio client using our project credentials and use the verification service to send a verification code to the recipient number present in the request body.
From the endpoint above we generate a verification code which is sent directly to the provided number by Twilio Verify. When successful it ends the request with a 200 status code to indicate to the client that the operation was successful.
Note: The recipient’s number must follow the E.164 Telecommunication Numbering Standard to be valid when creating the verification code.
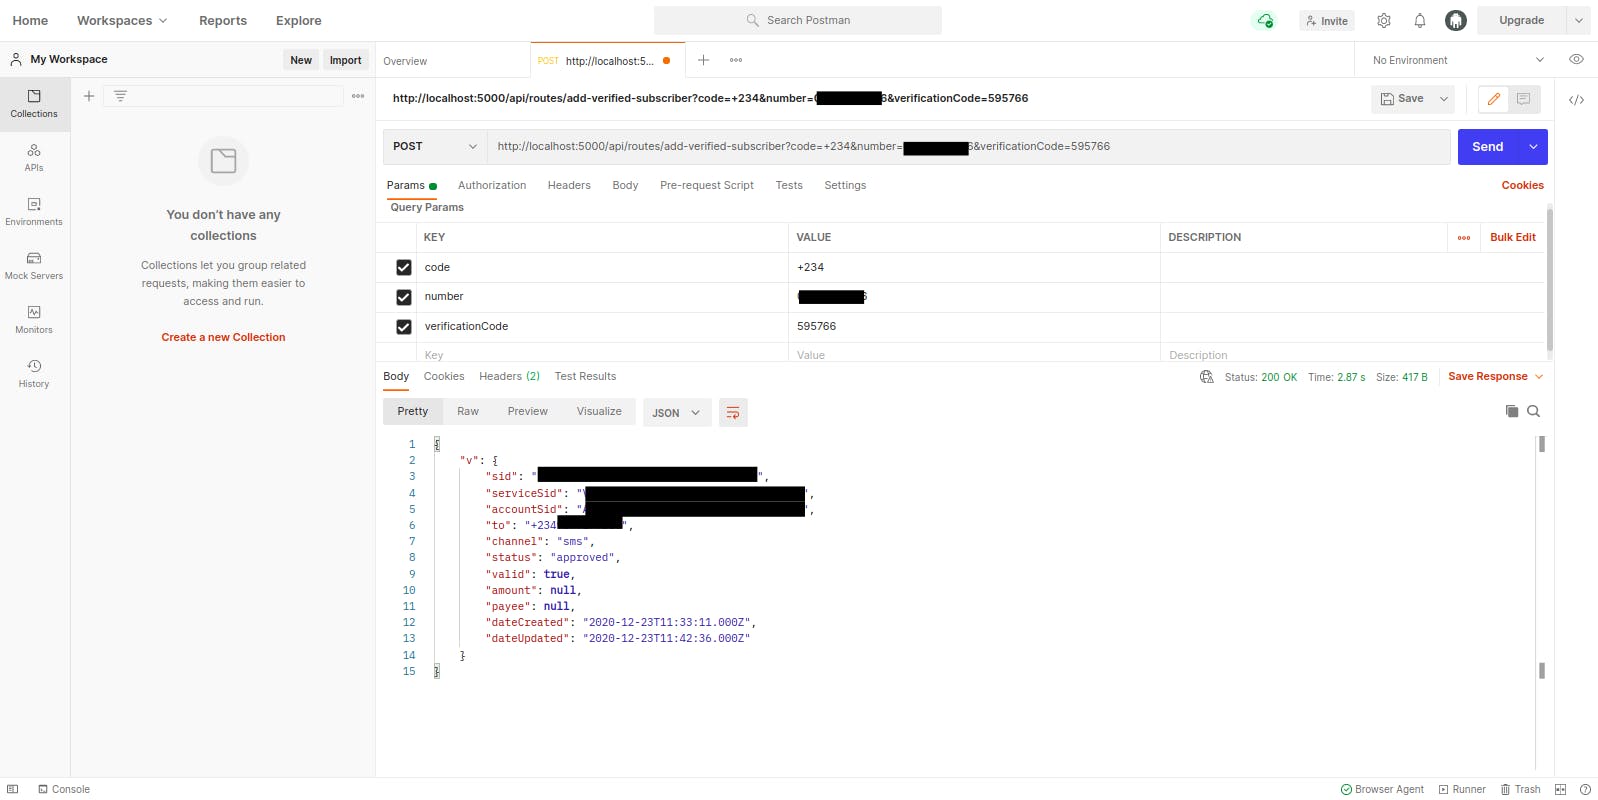
We can test this endpoint using the Postman web client. We create a new request, providing a valid mobile number and the recipient’s country code in the request parameters.

From the image above, we can see the insensitive details contained in the response object gotten after sending the recipient’s number to Twilio verify to generate a verification code. The status property within the object is set to pending, indicating that this mobile number has not been previously verified by our created service.
Next, we implement the add-verified-number route to verify the code which has been sent to a recipient by the Twilio Verify service and also store the verified mobile number in the array of subscribers to be notified when the movie is launched.
app.post("/add-verified-subscriber", async (req, res) => {
 const { countryCode, mobileNumber, verificationCode, movieId } = req.body;
 const accountSID = process.env.SID;
 const authToken = process.env.TOKEN;
 const SERVICEID = process.env.SERVICEID;
 const twillioClient = Twilio(accountSID, authToken);

 const recipientNumber = `+${countryCode}${mobileNumber}`;

 twillioClient.verify
   .services(SERVICEID)
   .verificationChecks.create({
     to: recipientNumber,
     code: verificationCode,
   })
   .then((twilioResponse) => {
     Movie.findByIdAndUpdate(
       movieId,
       { release_subscribers: [recipientNumber] },
       (err) => {
         if (err) {
           res.status(404).send({ error: `Movie: ${movieId} not found` });
         }

         res.status(200).send({ status: twilioResponse.status });
       }
     );
   })
   .catch((e) => res.status(422).send({ error: e }));
});
We run an API test on this second endpoint, using the Postman web client. This time we would provide the verification code received via SMS, the recipient’s country code, and mobile number in the request body for verification.
From the image above, we can see the insensitive details contained in the response object obtained after verifying the verification code received by the recipient. This time, the status field in the object is set to approved.
Sending SMS Messages
We would implement the send-release-notification endpoint to send an SMS message to all mobile numbers present in the release_subscribers array in a queried Movie document.
We replace the dummy endpoint with the following code to do this;
app.post("/send-release-notification", (req, res) => {
 const { movieName } = req.body;

 const accountSID = process.env.SID;
 const authToken = process.env.TOKEN;
 const twillioClient = Twilio(accountSID, authToken);

 Movie.findOne({ title: movieName }, (error, data) => {
   if (error) {
     res.status(404).send({ error: `movie : ${movieName} not found` });
   }

   Promise.all(
     data.release_subscribers.map((number) =>
       twillioClient.messages.create({
         to: number,
         from: process.env.MESSAGING_SID,
         body: `Your ${data.category} movie ${data.title}, was released today`,
       })
     )
   )
     .then(() => {
       res.status(200).send({ status: "MESSAGES SENT" });
     })
     .catch((err) => console.error(err));
 });
});
From the POST endpoint above, we fetch a single Movie document using the id contained in the request body then we map over the release_subscribers array, each time sending an SMS to the verified number using Twilio, we then wait for the individual created promises to be resolved then we end the request with a 200 status code and a message.
After we get our first movie subscriber using our web application, we would test this endpoint from the command line using cURL .
Now that we are assured that the backend application flow works as expected, we can proceed to set up our React.js application to consume the REST API which has been created here.
Setting Up A Movie Web Application To create a web application that sends data to the backend application to verify a user’s mobile number, we would go through the following steps:
- Bootstrapping a React.js web application.
- Building a component containing subscription details
- Verifying the user’s mobile phone number before subscribing to a movie.
Bootstrapping A React.js Web Application We would use a web application to collect a user’s mobile number when they try to subscribe to a particular movie.
We would expand this pre-built React.js application. It already has a home page containing some styled cards. To get started, we clone the web application locally from Github with:
git clone https://github.com/vickywane/twilio-movie-app.git
After cloning, we change into the project directory and install the project dependencies using the command below:
cd twilio-movie-app && yarn install
Now we can start the React app by running yarn start and view it through the web browser at ``http://localhost:3000.
Handling User Subscription:
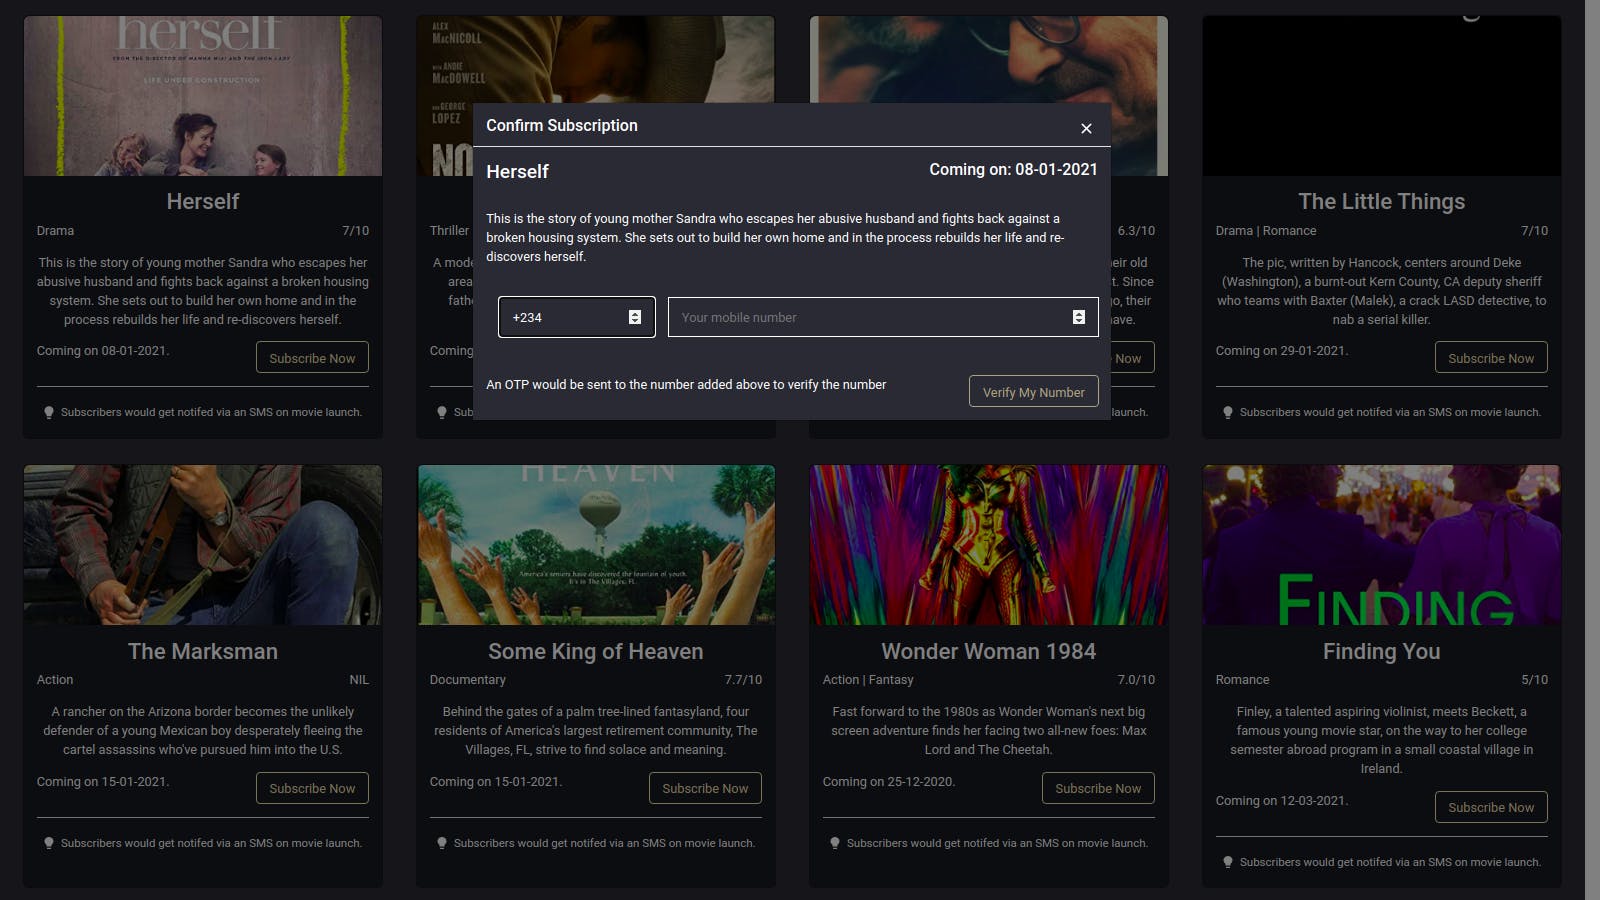
We want to display the subscription details in the form of a modal displayed on the home page when the subscribe button is clicked on a movie card. To do this, we create a new component using react-bootstrap modal component in a new file.
// subscription-modal.js

import { useState } from "react";
import { Modal } from "react-bootstrap";
import { FiX } from "react-icons/fi";

const SubscriptionModal = ({ showModal, closeModal, details }) => {
 const [mobileNumber, setMobileNumber] = useState("");

 return (
   <Modal
     size="lg"
     show={showModal}
     style={{ marginTop: "5%" }}
     onHide={() => closeModal()}
   >
     <div style={{ background: "#282c34", color: "#fff" }}>
       <div className="modal-header">
         <div className="align-center">
           <h5> Confirm Subscription </h5>
         </div>

         <div className="align-center">
           <div onClick={() => closeModal()}  className="icon-hover" >
             <FiX />
           </div>
         </div>
       </div>
       <div className="container">
         <div className="flex">
           <div className="center">
             <h4> {details.title} </h4>
           </div>

           <h5 style={{ textAlign: "left" }}>
             Coming on: {details.release_date}
           </h5>
         </div>
         <p>{details.synopsis}</p>
         <br />
       </div>
     </div>
   </Modal>
 );
};

export default SubscriptionModal;
The modal component above is imported and rendered in the Home component using props passed from the Home component down to this Modal component to control its visibility and pass details about the selected movie.
Collecting A Recipient’s Number
To collect a recipient's phone number we copy the code snippet below to add a new form element within the modal component containing two input fields and a submit button.
// subscription-modal.js

     <form style={{ textAlign: "center" }} onSubmit={() => {} } >
          <div style={{ display: "flex", justifyContent: "center" }}>
               <input
                 className="input-field"
                 placeholder={"Country Code + "}
                 style={{ margin: "0 1rem", width: "35%" }}
                 onChange={(e) => setCode(e.target.value)}
                 type="number"
               />
               <input
                 className="input-field"
                 placeholder={
                   mobileNumber.length < 1 ? "Your mobile number" : mobileNumber
                 }
                 onChange={(e) => setMobileNumber(e.target.value)}
                 type="number"
               />
             </div>
             <br />
             <br />

             <div className="flex">
               <p> A code would be sent to the number added above for verification. </p>
               <div>
                 <button
                   disabled={mobileNumber.length < 1}
                   className="btn"
                   onClick={() => {
                     setNumberVerification(true);
            setVerificationStatus(“SENT”);
                     handleVerification({
                       code,
                       id: details.id,
                       number: mobileNumber,
                     });
                   }}
                 >
                   Verify My Number
                 </button>
               </div>
             </div>
        </form>
The two input fields above only accept number fields, one for the recipient’s country code and the other for the recipient number. The input from these fields would be stored into the local component state for use later, using the attached onChange event handlers.
We also copy the function below into the modal.js file to make an HTTP request to submit the data gotten from the input fields above to the backend application at the click of the Verify My Number button.
// subscription-modal.js

const handleVerification = ({ number, code }) => {
 const ENDPOINT = process.env.REACT_APP_ENDPOINT;
 const requestBody = JSON.stringify({
   countryCode: code,
   mobileNumber: number,
 });

 fetch(`${ENDPOINT}/verify-number`, {
   method: "POST",
   headers: { "Content-type": "application/json " },
   body: requestBody,
 })
   .then((res) => {
     if (res.status === 200) {
       return res.json();
     }
   })
   .catch((e) => console.log(e));
};
The function above accepts the recipient’s country code and mobile number as parameters and makes a POST network request to the /verify-number API endpoint, using the function parameters as the request payload after they have been serialized.
Putting all the code snippets together in the subscription-modal.js file, we have a modal component that displays a brief detail about a movie with two input fields and a button to collect a recipient’s country code and mobile number before they are sent the Express.js application for verification.
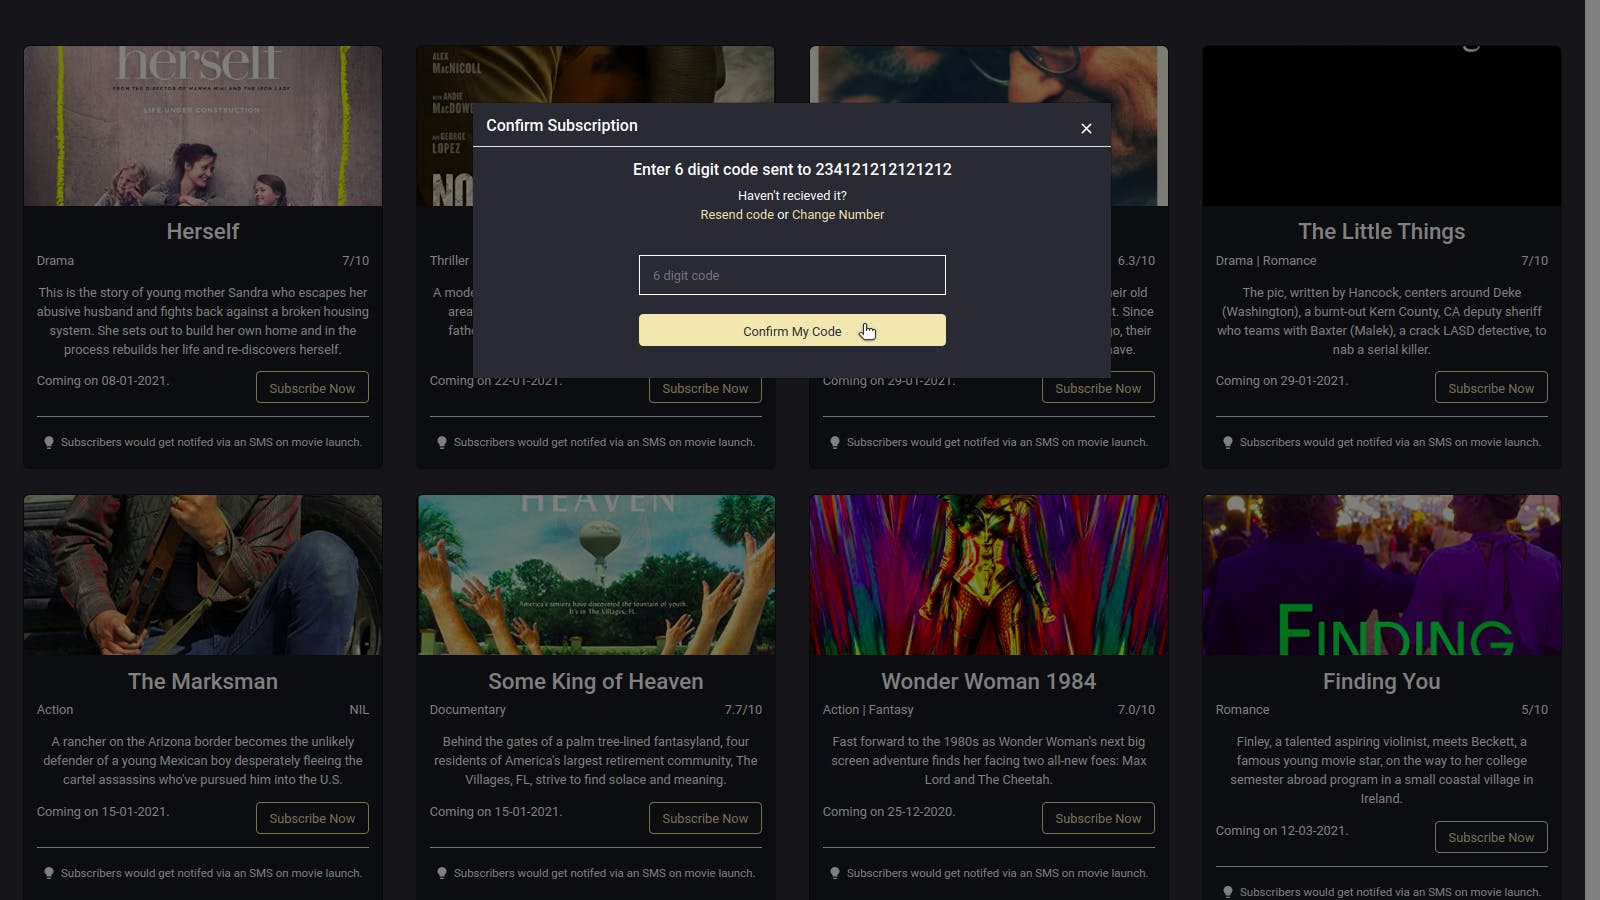
Processing Recipient Verification Code
After the request made to send the recipient’s number has been resolved successfully, we switch the modal’s view to prompt the user to input the received code within a new form element.
We add this code below to wrap the previous JSX elements in a ternary operator, starting from the modal-container div class;
 // subscription-modal.js

{verificationStatus === “NOT SENT” ? (
         <div className="container"> {/* PREVIOUS MODAL VIEW */} </div>
       ) : (
         <div className="container">
             <div>
               <h5 className="align-center"> Enter 6 digit code sent to {code} {mobileNumber} </h5>
               <p style={{ textAlign: "center" }}>
                 Haven't received it? <br />
                 <span className="clickable"> Resend code </span> or{" "}
                 <span className="clickable" onClick={() => setNumberVerification(false)} >
                   Change Number
                 </span>
               </p>
               <br />

               <form style={{ textAlign: "center" }}>
                 <input style={{ width: "50%" }} className="input-field"
                   placeholder="6 digit code" onChange={(e) => setVerificationCode(e.target.value)}
                   type="number"  />
                 <br /> <br />

                 <div className="align-center">
                   <button  className="btn" style={{ width: "50%" }} onClick={() => verifyCode()} >
                     Confirm My Code
                   </button>
                 </div>
               </form>
               <br />
             </div>
           div>
       )}
Above we use the value of the sentVerification local state with a ternary operator to switch the view when the POST request to send a verification code to the recipient is successful.
Verifying Recipient Verification Code
After a verification code has been sent to the recipient number by Twilio Verify, we need to verify that the current user was the one who got the code.
To do this, we add a new function that accepts the recipient's mobile number, country code, and verification code from its parameters and makes a POST request to the add-verified-user endpoint in the Express.js backend application.
 const verifyCode = () => {
   const ENDPOINT = process.env.REACT_APP_ENDPOINT;
   const requestBody = JSON.stringify({
     verificationCode: verificationCode,
     mobileNumber,
     countryCode: code,
     movieId: details.id,
   });

   fetch(`${ENDPOINT}/add-verified-subscriber`, {
     method: "POST",
     body: requestBody,
     headers: { "Content-type": "application/json " },
   })
     .then((data) => data.json())
     .then((response) => {
       if (response.status === "confirmed") {
         setSubscriptionStatus(“CONFIRMED”);
       }
     })
     .catch((e) => console.log(e));
 };
Above we serialize the recipient's verification code, mobile number, and country-code into an object and add it to the request payload of the POST request being made using Fetch.
After the promise from the network request is successful we change the modal view again, this time informing the user that the verification code is correct and they have been successfully subscribed to the movie.
We wrap the verification-success-container in another ternary operator to switch the view after the recipient’s code has been verified.
// subscription-modal.js

   {subscriptionStatus === “NOT SENT” ? (
         <div className="container"> {/* INITIAL MODAL VIEW */} </div>
       ) : (
         <div className="verification-success-container">
           {subscriptionStatus === “CODE SENT” ? (
             <div>    {/* VERIFICATION CODE SENT MODAL VIEW */}    </div>
           ) : (
             <div className="container">
               <br />
               <br />
               <h5 style={{ textAlign: "center" }}>
                 You have been subscribed for {details.title}. <br /> You would
                 be notified on {details.release_date} when the movie is
                 released via an SMS.{" "}
               </h5>

               <br />
               <br />
             </div>
           )}
         </div>
       )}
Above we used the value of the verificationStatus state value to switch to the final view after the recipient's number has been verified.
Sending Movie Release SMS
At this point, we have our first movie subscriber with a verified mobile number. We can now test the send-release-notifications endpoint in the backend application.
We make a POST request to the send-release-notifications endpoint from a terminal window using cURL with the subscribed movie name as a request parameter.
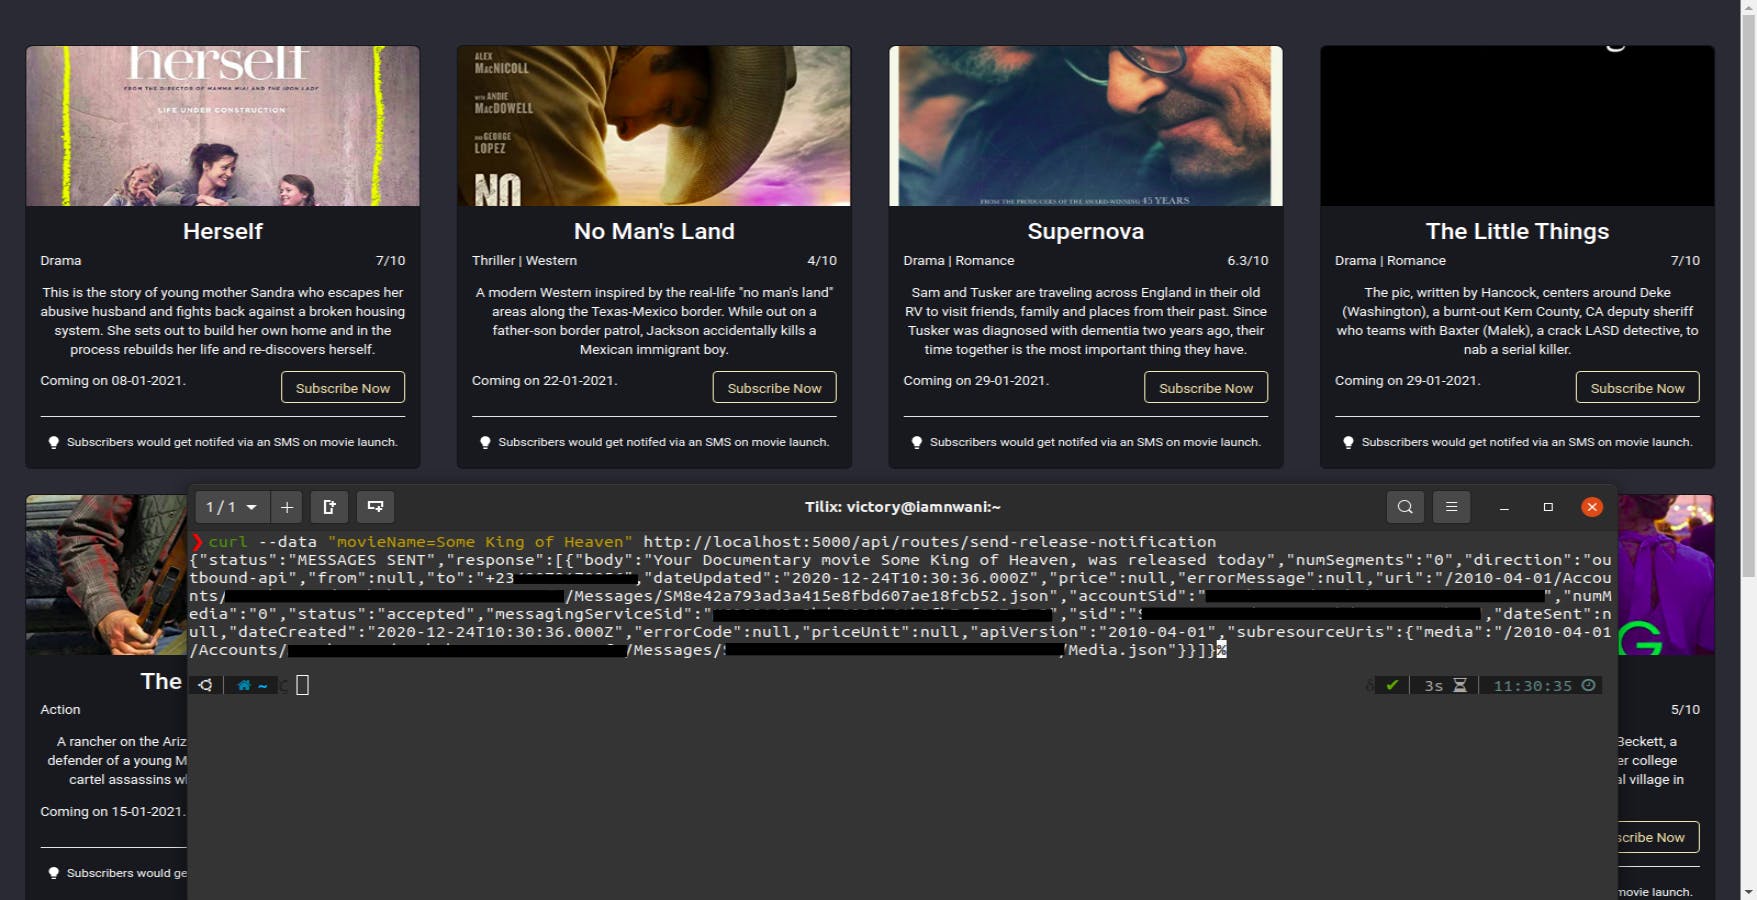
After the curl request has been executed, all subscribed recipients would receive an SMS announcing the release of the subscribed movie and they can resume their excitement as they view the long-awaited movie through the help of the fun application we built while learning about Twilio SMS and Twilio Verify.
This web application has been deployed using Netlify and can be accessed here. Feel free to reach out to me on Twitter if you would like to improve the application or you can open a Pull Request, or even clone the repository locally.